

DIY: Bracelets Made Of Necklace

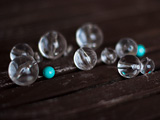
A while ago I bought two second hand plastic necklaces: a mint one and an icy transparent one. Thought the beads had trendy colors, the necklaces themselves had quite an unfashionable look. Well, I did not want to wear them, not at all. My plan was to turn them into bracelets 🙂
Here is my little DIY that shows how to convert outdated boring accessories into new exciting ones!

Loosen your necklace to beads and put the beads into a container. If the beads have different shapes or colors, it would make sense to sort them accordingly.
To plan your design, you will need a necklace planning board.
The planning board is one of the most important from my point of view things for a jewelry maker. It is super convenient and allows to see the placement of the beads as a whole. The board has special curved rows for necklaces and straight ones for bracelets. The numbers along the rows mark inches, so it is easy to measure the length of the piece you are making.

You will also need the following supplies: some elastic cord, a paper clip, craft glue, and tweezers to move beads around.
Measure your wrist and add about 0.5” to the measurement. The bracelet should hang a bit loosely around your hand.
In my case I got 6.5” for the wrist, so the final length was 7”.

Arrange the beads on the board according to the desired design.
Remember that you will need to hide the knot in one of the beads. This may affect your design. If your beads have tiny holes, you may want to add a extra bead with a bigger hole. This bead should be placed in the end of the layout thus next to the future knot.
Cut a piece of the stretch cord with the length equal to the final length of the bracelet (7″” in my case) plus about 2” on each end. Extra inches will help you to tight the knot comfortably.
Attach the paper clip to one end of the cord to prevent your beads from coming off the cord. Some crafters do not like using a paper clip as a bead stopper. From my point of view it is a fair and convenient replacement.
Now start stringing!
After finishing, you may want to try the bracelet out on your hand. It is your last chance to fix something before finishing!

Make a secure knot (thanks to www.beadfx.com for the picture!)

Tighten the beads together while pulling the knot. It is better to not make the bracelet loose. The elastic cord tends to stretch with time thus adding not-so-pretty gaps between the beads.
Secure the knot with glue. Follow the instructions written on your glue. Some of glue may need an additional fixation after applying.
Hide the knot into the knot-masking bead.
Let the knot rest for several minutes. Again, read the glue instructions about the precise time.

And here come the bracelets!

Happy DIYing!
P.S.
A picture of before and after! 😉

Disclaimer: Yup, this post may contain affiliate links! If you buy something from me, I get some margarita money (not enough to buy a pair of shoes). Read more here.

super cute bracelet, nice color 🙂
thanks 🙂 they are my favorite, a great addition to any colorful outfit!
Great idea! The bracelets look very good! Nice work 🙂
Thank you! I like them, too 🙂
I had some cheap cord and the glue worked good with it. But i bought some nice Stretch Magic…and the knots on that cord unravel instantly. I dont get it!
I see…
well, I am glad you found my knot useful 🙂
I don’t think I’ve ever tried a surgeon’s knot! I will have to try that. I have the hardest time getting knots to stay- especially when using the clear elastic cord!
yeah, it seems to be a common problem! do you use glue to secure it?
Those are great! Slip in some pony beads and you can knit them in. There’s elastic thraed you can buy that will make stretchy bracelettes. Make a long, long piece and either coil it into a pot holder (cotton or pure wool yarns only so they won’t melt) or teacher your daughter how to make a coiled basket to hold her trinkets. You’d just need a blunt needle and a long piece of yard to whip those together.